Glyphs of Time :: a blog by jarvis grant

May 1, 2012

Composites: Selections, mask and more!

Filed under: Design,Education,Observations,Photoshop — Tags: , , , , — Jarvo @ 4:18 pm
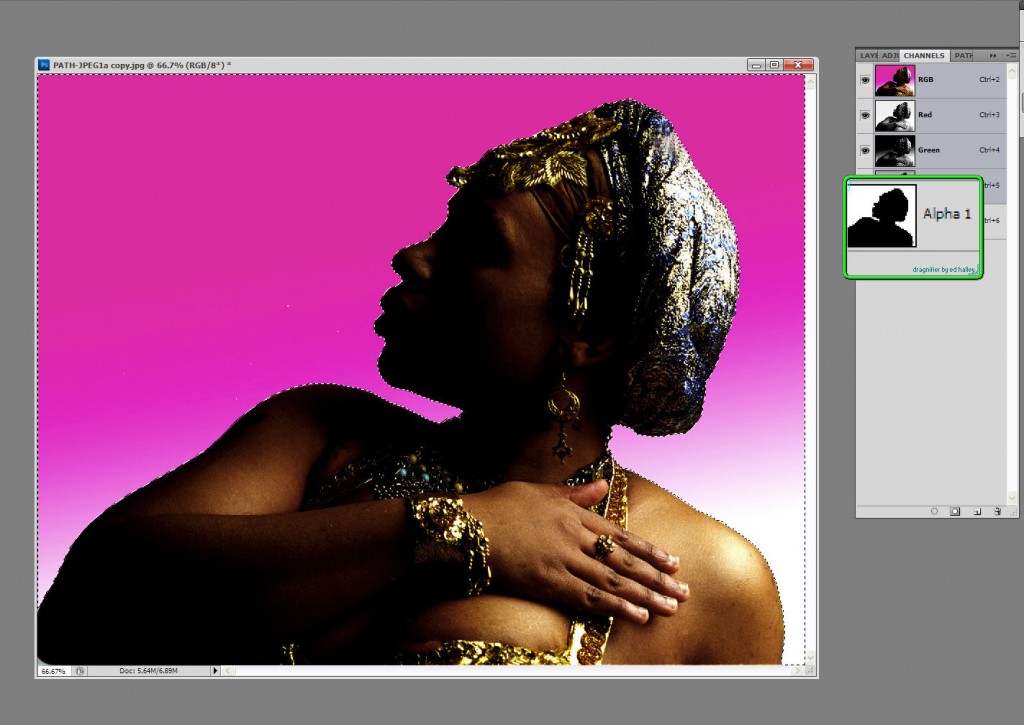
Full Screen Shot

Selections are Alpha Channels that are used in creating Mask. Here is the main figure used in my composite, "Isis". ©Jarvis Grant 2012

Knowing how to make a selection in Photoshop is an artist’s secret weapon. It’s the most important tool/technique that one should master as early as possible. With that said, there is no single “best” ways to create a selection. Everyone has a couple of go to favorites. New students usually start with what Scott Kelby coins as the “Tragic Wand”. Once you understand that there’s more tragic than magic  in that wand, you start to look for options. For many it’s using the Path Tool, which I personally hate! For others it can be the Color Range command. The folks at Adobe know that power and the pain of creating selections and have been developing the Refine Edge command into its on Panel in Photoshop since version CS4. Back in the day, those “marching ants” were at the heart of composting images for designers and illustrators. Yet today there can be more to making a composite than selections.

I’m thinking and writing about this topic because last week I put together  an article on Examiner.com on Saving Selections in JPEG Files. When ever I do an article I first collect the images I’ll use for the article. Then I’ll go through what ever process I’ll be writing about to get the steps clear in my head. First, I wanted to choose an image that I could make a very simple selection with. I had a partial silhouette shot in the studio that would work fine. Went through th steps and made a few screen shots. I was done. The only thing needed now was a new background for the figure to illustrate the new image composite. No big deal, two layers and that will be that. I had a few NASA wallpapers from the Hubble Telescope web site I felt would make a quick and dirty yet fairly interesting image. In fact it turned out to be interesting enough that I seemed to be on a roll! So much so that I began to think about this blog post.
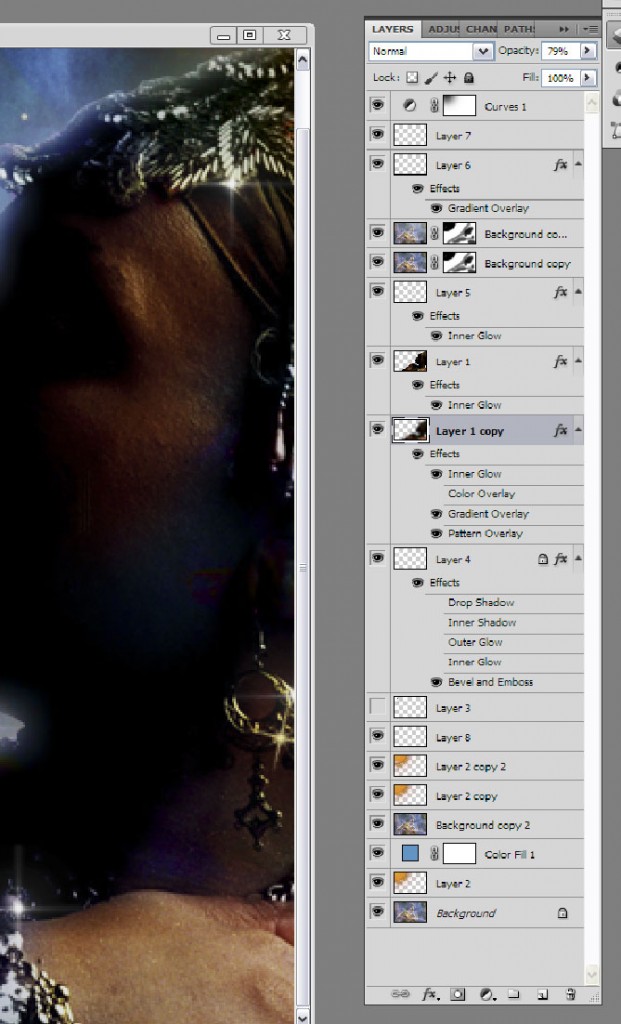
The Layer Panel for Isis

What started just to be two layers turned out to be a few more. ©Jarvis Grant 2012

What started as a simple story with two layers began to grow. Once the main story was invented, I needed to enhance the “mood” of the piece. To achieve this I began to use Blending Modes. The interesting thing was that I was still just using the the main images of the figure and her new background. Using Layer Masks, dupes of the background were now being place on top of the figure, with elements being hidden or accentuated. Portions of the figure were selected and moved to their own layer and painted with Layer Styles. I also had a little help from Flaming Pear and Dover Publications. Well my point here is to not really go into detail of how the new image was made, but to speak to the fact that when “building” a composite it takes more than just ‘marching ants”.

While the final image is a fantasy, as a photographer, I still need elements of reality to bring it altogether. What is the direct and ambient light doing? Along with a healthy dose of trial and error. For example the NASA image though stunning, had a few visual holes into once the two images were placed together. I didn’t want to select stars from the background, because it only had a few, and I waned a little more variety. I found a few “space and star” brushes on the Internet. Through some that “trial & error”, I placed my new “stars” on their on layers and used Gradient Overlay Layer Styles, set to radial mode to give my stars that refraction of color that telescope give to photographs.

This was a simple artistic exercise that also used another secret artistic ingredient, Fun! In having a little fun I learned a few tricks and techniques that will turn up later in future work. Or maybe not! What started out as one thing with one purpose grew into something else. It also shows that even through working with a computer can seem overly technical, in the end, Photoshop is just another tool for artist to use and flow with.

A Dream of Isis

The final composite (so far!), of "A Dream of Isis" ©Jarvis Grant 2012

 
Share

April 21, 2012

Photoshop World DC 2012: Cool & Fun

PSW 2012 Seal

Photoshop World DC Seal

Well Photoshop World DC has come and gone! It was great having Photoshop on the Green & Yellow Metro line. No airports hassles, no hotel hang ups, just a quick three block walk to the Metro and then a quick 15 minute ride. BAM, I’m there! Photoshop World, a three day Photoshop Lovefest!  Yet I must confess, it’s not the experience it used to be for me ten years ago. While I felt I knew my way around Adobe Photoshop back in 2000, I began my digital imaging experience with Aldus PhotoStyler 1.0 in 1993 and migrated to Photoshop 3.0 in 1995 (Adobe bought Aldus). Photoshop 5.0 was still quite the Magic Box. Scott Kelby and NAPP  (National Association of Photoshop Professionals) opened a brave new world of digital imaging and design to me. Back then Photoshop World was simply amazing! Back in the day, Photoshop was a design, illustration, and prepress tool. Despite its name, there was very little photography going on at Photoshop World. There was only John Paul Caponigro and Jim Divitale talking about Photoshop for photographers.

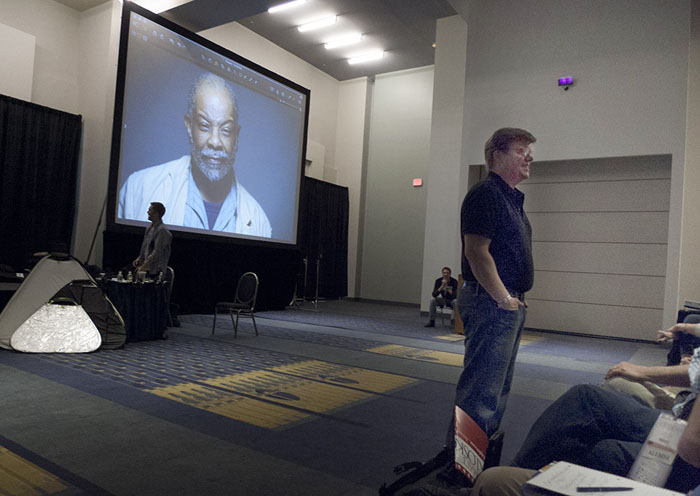
Joe McNally explains speedlite technique with yours truly as workshop model! ©Jarvis Grant

Well, now all of that has changed. Photoshop World is extremely photography centric.  There’s was very little talk of design issues, no prepress except for two sessions by Dan Margulison LAB color, some video and some web, and a little video. The rest was photography. I should be happy, right? Well, I was. But after 30 plus years as a photographer and arts educator, I know the relationship of exposure of/stop, shutter speed and ISO, marketing, an exhibiting fine art photographer, etc. Plus, I also know that gear has very little to do with great image making. I’m also a Photoshop ACE (Adobe Certified Expert). I say that not to imply I’m a giant Photoshop Intellect. Not by any means.  For the most part Photoshop World, this year, allowed me to see that I was on the right track in my continued career goals, and that I actually know a thing or two! But hey, I am always looking for a couple of jewels to add to my utility belt.

Those pearls of wisdom and magic did present themselves to me from Calvin Hollywood and Greg Hessler. I got my Photoshop fix from German photographer Calvin Hollywood and my photography inspiration from Greg Hessler. Plus the mad cap antics Russell Preston Brown can be a bit “over the top” they never, ever disappoint! Not to mention some old tile religion from from speedlite wizard  and photo journalist Joe McNally. Some really good stiff. Whoa, don’t let me forget the geeky-krazy Corey Barker. Corey is very old school Photoshop. His Photoshop For Designers session definitely got to the core of what being a Photoshop Maestro is all about! He is also the creator of Photoshop Planet.

So, the next stop for Photoshop World is at Las Vegas, officially known as Photoshop West. If you have never gone to a Photoshop World, check it out. Also, when you go, don’t walk around with your Big-Ass DSLR! What’s the point? There’s nothing to shoot with it, except for at a couple of booths that do have models and lights set up. I recommend taking a  point & shoot. You’ll be be more free, and you’ll get more photos, and besides you’ve got three days!

Slideshow:
Fullscreen:
 
Share

March 18, 2012

Photoshop World 2012 Comes to Washington, DC

Photoshop World DC 2012 Poster

Photoshop World 2012 East Comes to DC! ©NAPP

Well, NAPP’s (National Association of Photoshop Professionals) Photoshop World is finally coming to the nation’s capital! That’s great, cause that’s were I live! Ya know, I’ve been a member of NAPP since 2000, or is it 1998? At any rate it has been for quite some time. NAPP is, by far, the best professional organization for people who use Photoshop and want to learn more about the program. With that said, Photoshop World is the best way to immerse yourself in all things Photoshop. The worlds best trainers and authors of Photoshop are in one location, and attendee have the best opportunity for meeting and conversing with them one on one. Photoshop World also affords you the chance to connect with vendors who are on the cutting edge of digital imaging. Well, at least the cutting edge at that moment! Now, with that said, Photoshop World can be like a Miles Davis concert during the 1980’s. As strange and bizarre as it can be, you can’t get help get a Golden Nugget unavailable anywhere else.

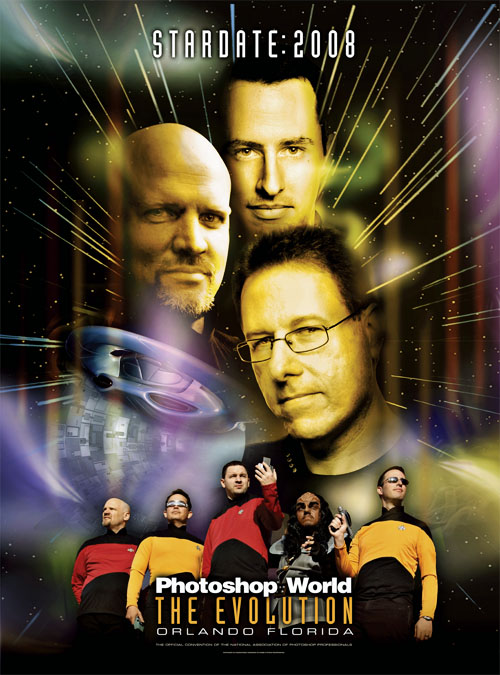
Photoshop World 2008 "Star Trek" theme

I wasn't going to the 2008 Photoashop World until I found out it was going to have a Star Trek theme! ©NAPP

Each year the conference has a theme. It can be anything.  From Formula One racing to boxing.  Themes can be based on popular culture like like Motown (Photown!) to a KISS Concert and  Star Trek. Kinda wacky for sure. Yet the business of doing Photoshop is taken very seriously. When I first started going to Photoshop World is was graphic design and illustration. Then later, web graphics, and finally photography and  digital video. Whatever’s the trend Photoshop World tries to get its membership up to speed on it. Yet I have to say, when I first attended Photoshop there was very little about photography. John Paul Caponigro and Jim DiVitale were the only Dream Team members that talked about photography and then Kevin Ames.  That’s because they were photographers! Then Russell Brownbegan showing photographers some very cool Tips & Tricks.Now, it seems Photoshop World has turned into a photography conference, simply because that is the “trend”.

Okay, with all that said, if you are in the Washington DC metro area, you should definitely stop by Photoshop World, If you’re not interested in the full conference, or think it’s too expensive, then get the Free Photoshop World Expo Pass. This pass will allow you to visit the Photoshop  World Expo floor. At the Expo many of the Photoshop Dream Team Instructor will be giving 30 minute  presentations.

So be sure to stop by the Photoshop World. It’s a three day Photoshop Love Fest  well worth the visit! You can stay in touch via the Photoshop World Hashcaster Site  and The Official PSW iPhone App.

See ya there!

 
Share

December 20, 2011

Eddie Tapp: Image Rescue Webinar

This webinar is part of x-rite’s educational series of color management webinars. I found that this webinar was extremely informative, and clear approach to understanding how to correct image color problems. This video by Eddie Tapp is about one hour long, but moves quickly. Definitely worth a bookmark.

Webinar: Image Rescue for Problem Files with Eddie Tapp! from X-Rite Photo on Vimeo.

 
Share

October 4, 2011

Photoshop’s Content Aware Fill: The Agony & the Ecstasy

When Adobe’s Photoshop CS5 was introduced, its biggest marketing ploy…uh I mean creative feature was Content Aware Fill. This feature allows you make a selection around some visual annoyance and like magic Photoshop will fill the selection with whatever is around or near the object in question. So if someone should walk in front of you while taking a photo, you can eliminate them using Content Aware Fill. Now in the old days of film, you would simple wait for a clear shot, but that’s so old skool!

So why Agony & Ecstasy? Some of you may remember that 1965 big budget film The Agony & the Ecstasy with Charlton Heston as Michelangelo and Rex Harrison: Pope Julius II. In a nutshell, The Pope wants sculptor Michelangelo to paint the Sistine Chapel ceiling, while Michelangelo wanted to sculpt the Pope’s tomb. So because the Pope had the power, he made a sculptor paint! And on his back 50 feet above the floor! It’s the same old story, corporate demands against designer vision, the marketing department’s messages against the design department’s voice. What’s all this got to do the Content Aware Fill? Adobe’s marketing department pushes feature sets to the weakest or newest users of their flagship product, Photoshop. Pushing fetures that “fix” apposed to features that “create”. This content aware feature is powerful when used as a creative tool. Here’s one way.

In this example, I’ll use Fig.1. Normally, we would use the, Content Aware Fill (CAF), to get rid of some out of place element, like the building to the right. Here I’ll use the couple walking on the sidewalk. First, I’ll use the Quick Selection Tool to select the couple. Just a Note: CAF does not “create” content, it replicates content found near the selection. I choose the walking couple because they were on the grassy plane. I didn’t choose the person in front of the bus top because Photoshop would not be able to Create the missing segments of the bus shop. For best results, after the selection is made go to Select/Modify/Expand and choose about 4-16 pixels. When this is done Photoshop will compare those pixels inside of the selections border with those near the outside of its selection border. It will take that information and guess at what should be on the inside. Once we have the selection hold Shift/F5 to bring up the CAF dialog box (Fig.3), and click OK, and like magic, the couple is gone. Now, there’s always a little Stamp (Clone) Tool cleanup, but 90% of the work is done (Fig.4).

Slideshow:
Fullscreen:
Okay, now when I took this photo, the subject was the sky and those beautiful lush clouds. I wanted the clouds that were near the horizon and didn’t want to lose them by tilting the camera higher. I then suddenly thought of CAF! Get rid of everything except the clouds. This should work great on an organic fractal pattern element like clouds. When I got back to the studio, I tried it and it worked like a charm Fig. #5 – #10. I simply selected the bottom of the image with the Lasso Tool and hit Shift/F5. I thought I was done because I just want some cloud pictures as elements with other photos., so I tried it again. This time I hit Ctrl +J (Cmd+J for Mac) and created a duplicate layer of the original shot. On Layer 1 I did that CAF magic. Now for fun, I made a layer mask (FIG.6) and brought back the person walking on the sidewalk along with their shadow. This looked natural because all the lighting was the same!

This was looking pretty good, but something was missing. The story was almost there, this person walking in the clouds needed a destination or something, so I added a Moon. This planet was made in Photoshop using Flaming Pear’s LunaCell plug-in filter. LunaCell creates instant planets. Fractal, reality-based, or start from scratch to make strange new worlds. I got a couple of atmospheric moon already and just added one using the Blend Mode of Screen.

Slideshow:
Fullscreen:

By thinking of creating an image not fixing a photo, I was able to turn a gorgeous day in Washington, DC, from urban landscape into a Dreamscape. In part with the help and power of Content Aware Fill and a little personal vision.

The Dream Catcher

The final image with all of its new elements in place, ©Jarvis Grant

All images & rights. ©Jarvis Grant

 
Share

July 9, 2011

Revisiting the Gigapan

A few weeks ago I pulled out my Gigapan EPIC. This is a device developed by Gigapan Systems which allows the creation of large scale gigapixel panoramas. That’s right Gigapixel panoramic images. It does so by stitching together single multi shot megapixel images. I explained this in more detail in my blog post, The Gigapan Pano Portrait. The reason for this renewed interest in my Gigapan EPIC was a project, Nearby Nature Gigablitz, sponsored in part by the Fine Outreach for Science program and  their partners at Carnegie Mellon University’s CREATE Lab. The project asked people who were members of Gigapan.org to make panos of nature that was near where they lived and worked. Since I live in walking distance to the Rock Creek National Park, went down there and setup near the edge of Rock Creek and its Bike Path.

As I shot the “still life” of the landscape I hadn’t any real problem, other than remembering the regiment of using the equipment with my Panasonic LX3. This is my “carry-with-me” camera. The LX3 is a ten megapixel point & shoot with a very nice 24mm wide 2.5x optical zoom LEICA DC F2.0 lens.  So like I said no problems, no worries. But, when I decided to have the Bike/Runner’s Path in the scene, that when I started to have some issues. Since I was by myself, I did the best I could in scouting up and down the path trying to look out for bikers & runners. I was trying to avoid traffic because the Gigapan shoots a series of aligned images that are stitched together. As much as I tried, I always got someone in the scene! Then while swatting away all manner of little flying bugs and sweat, I decided just to shoot very small panos of the Path itself, and figure it all out later.

When I got back and processed the images, converting the RAW files to TIFFs. I first worked in the more classic landscape images. Gigapaners have a tendency to create these great big panoramic images with lots of detail. Creating a very interesting image because you can zoom in and see minute details found with in the scene. That’s what happens when you have a five gigapixel image. My approach was to produce an interesting photograph first.  Light, color, composition, and what Jay Maisel calls “Gesture” are more important than the curious details I’m not even aware at the time of capture. Here are two examples from that shoot. Use the navigation controls to pan and zoom inside of the images. You can also use your mouse wheel to zoom, click & drag to pan.

Okay, now that Bike Path shot. Well I did it! I was able to create a panorama that had a clean clear path in it. To my surprise, I didn’t really like it. I mean it was a good image, but I started to think, maybe having a human element would actually be good. Since I had several “sub-sets”  of the panorama, I began to look at them. To my surprise, there were a couple of good shots in there. I had used a fairly fast shutter speed of 1/400 so the runners & bikers were all frozen in stop action. I had a couple of shots with a guy in a red shirt. With all of the lush green in the images that little spot of red was a great color contrast. Once I had the full “empty path” pano completed, I placed the single frame with the runner in the scene. His tonality was a bit off, so I adjusted his frame to match, but the runner himself, was too dark. So I made another tonal adjustment. He looked great but his frame was now off. To address with issue, I made a  Layer Mask and erased everything in the scene but him. In the words of chef Emeril Lagasse, BAM! It was done. Here’s that panorama.

One of the things I learned from this episode with my Gigapan EPIC is that you can’t let the equipment dictate your creative vision. Now don’t get me wrong, equipment dictates a lot of stuff during a shot. But it’s not the master. I guess all of those little bugs swarming around me (along with the high humidity & temp) helped to break the equipments pull on me. So that during all that the landscape itself had an opportunity to talk with me. Alter all that’s what the whole thing was really about anyway. Capturing a sense of place.

 
Share

January 27, 2011

A Quick on Location Shoot

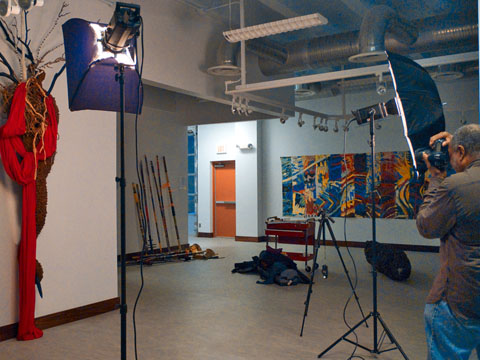
Late afternoon, Wednesday, I did a quick and dirty location photo shoot of a piece of art for my friend Martha Jackson Jarvis. The shoot took place at Prince George’s African American Museum & Cultural Center, in Brentwood, MD. Martha will be in an exhibit, Resonant Forms, with artist Frank Smith, and Alonzo Davis.  OK. I was at the gallery to photograph a piece for Martha titled, Scarecrow. The reason why this was to be quick & dirty was that by the time Martha & I got to the gallery about quarter of an inch of slush from freezing rain was on on the ground. By the time I had set up my lights, about 20 minutes later, the freezing rain had turned to heavily falling snow. With about an inch of snow on the ground and an early rush hour, we all wanted to hurry up and get out of there. DC doesn’t do snow very well! 

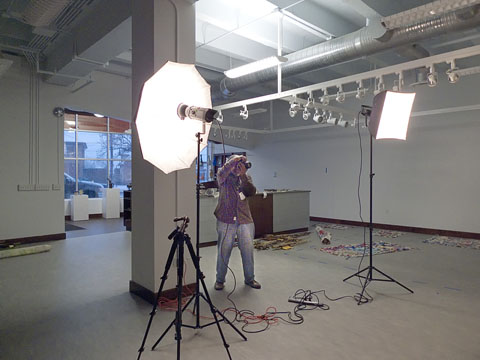
Light setup at Brentwood Art Center

Here I'm setting exposure and angle before final shots with tripod.

Setup at the Brentwood Art Center Gallery

Me getting the setup exposures before the final shots with tripod

 The setup was pretty straight forward. Two Calumet Travelite 750 strobes. One with a small Chimera lightbox as the main light, and another Travelite with a 24 inch Calumet umbrella, as the fill. Because of the sudden state of urgency, along with Alec Simpson, director of the Art Exchange, & his staff wanting to get out of there, I didn’t have a lot of time to finesse the lighting. So after I got things up, and Martha was OK with the basics, I started shooting.  

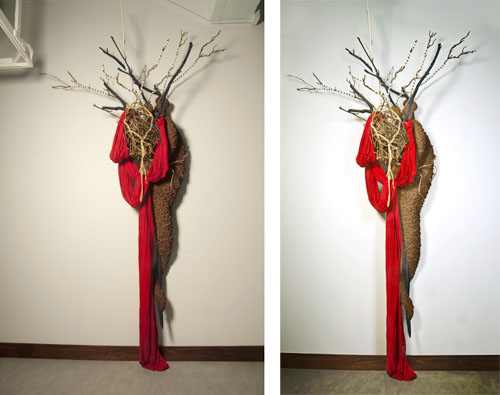
When I was shooting this shot I was thinking of how I would be doing the re-touch in Photoshop. When doing this you don’t want to be sloppy.or the retouch can go horribly wrong. This shot is for the exhibition catalog and other PR for Martha and the exhibit. So I want it to be very tight for publication. So when I got back in an choosing the best exposed RAW file, I first brought the image into Adobe Camera Raw. Here I did the basic exposure & color cleanup adjustments before exporting it into Photoshop. Next, I use Nik Define 2.0 to quickly reduce any luminous noise. I shot at ISO 200 so there really wasn’t much, but Define cleaned it up. After Define I used the Stamp tool to get rid of pipes and light fixtures that where in the way. I actually cropped the image first to minimize this work. Next there was some tonal enhancement to accentuate the lighting that was already present in the shot. This help the over all contrast. Finally I added a touch of drama and place with a burn & dodge hand painted vignette. 

I thought I was done, (and I pretty much was!) but the shadow on the image’s right side was too strong, So, I cloned it out , but that looked strange. Since the cloned data was on its own layer, I simply reduced its opacity. Now I could control that shadow, as if I changed the intensity & placement of the actual fill flash. Now I was done. I always keep the layered files, ya never can tell! I created a JPEG for Martha to give to the Gallery, and now I was done! 

Comparison of RAW & Retouched Images

The image on the left is the unprocessed Nikon RAW file. The one on the right is the retouched file.

 
Share

January 25, 2011

My New Photoshop for Photographers Class

SAAC Photoshop Class

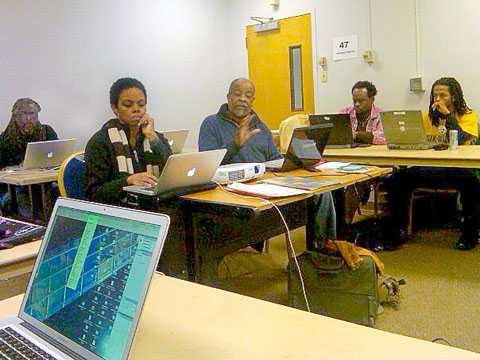
I discuss some of the finer points of Photoshop as Karen Baker works on her images during the class. ©Baba Kuroji Ntu-Patrick

On January 22, I gave my first class through the an organization called, Social Art and Culture, founded by Karen Baker.  The mission of SAAC is a broad yet focused one. It means to, “…encourage design that affects social change. SAAC “Art Activists” will use the power of the performing, visual, music and literary arts to address AIDS, education, housing, health and the environment within disadvantaged communities.”  I think of it as Proactive Arts Education.

Well, Karen had approached me in November of 2010 about teaching a Photoshop class for photographers. I was pretty excited about this opportunity. I have a tendency to try to squeeze in a lot of information into my adult classes, and such was the case with this one. As I had stated in another post, The Occasional Student, adult students really want the information, but you still have to make the information practical and accessible. This class of students ranged from seasoned veterans to people who just bought a camera. There were also designers in the mix, for both web and print.  My goal is to be sure that each student comes away with information that is useful to them and their photography. So, I mixed it up a bit with straight lecture, demo tutorials, and hands on tutorials. What I observed was that, all three worked, but the Demo/Hands-on seems the way to go. That seemed to flush out all issues people had with their computer/software setups. For me it meant getting of my butt and going to students with unique issues. Ah, back in the classroom again!

All in all, it was a great afternoon of fellowship and learning for everybody. Karen, a graphic design and PR pro was right in the mix! Toward the end of the class she announced that she would organize a “Part II” for this class. I wanted the students of go outside to shoot some new images, but at 16°F we opted to  “shoped” and stay indoors!

I’m looking forward to Photoshop for Photographers: Part II this spring.

 
Share

June 28, 2010

Painting in Photoshop CS5

Filed under: Design,Digital Tech,Education,How-To,Photoshop — Tags: , — Jarvo @ 10:23 am

Once again Photoshop CS5 shows itself to be a major upgrade. In this episode of The Complete Picture, Julieanne Kost shows you some of the new painting features in Adobe Photoshop CS5 including the new Natural Media Bristle Tip Brushes.

 
Share

June 7, 2010

Creating a Black & White Photograph

Filed under: Digital Tech,Education,How-To,Photography,Photoshop — Jarvo @ 5:07 pm

Now, this doesn’t sound like rocket science, and it isn’t, but care should be taken when making a black & white conversion from your image files. Today, many cameras have a built-in function which allows the photographer yo make a black & white image from the original color scene. While this feature is handy, you give up control of your image to an algorithm. Plus, if you’re a control freak like me, I may want that color image later. Now you may say, “Hey Jarvis, you can always flip the switch back from B&W to full color and shoot both!” And I say, “But why?” Why stand there playing with the camera instead of making wonderful photographs?

Well, in this video, I give you a Quick & Dirty overview of how to handle B&W conversion in Photoshop. You’ll see how to give yourself maximum control over many aspects of the conversion process and end up with a beautiful image that no camera algorithm or One-Click-Wow in Photoshop or Lightroom can give you.  Check it out.

 
Share
Older Posts »